General Information
Xylophone provides reports with a complex structure in forms of spreadsheets (XLS or XLSX format), PDF files or direct output for printing based on the XML input data. It can be used as command line tool and as a Java library.
The system has two separate XML parsing modes: DOM and SAX. The DOM mode allows for greater flexibility in defining the structure of the input data and the XML data reading with greater memory and computational resource requirements as a cost. The SAX mode introduces a few insignificant limitations on the XML file structure and on the reports descriptor, though it outperforms XML mode both memory consumption and performance wise and therefore is suitable for generating huge reports.
Xylophone does not require Microsoft Excel or Adobe Acrobat installation as well as any other software on the machine employed. The system utilizes the following open source projects as dependencies:
-
Apache POI — used in parsing and creation of Excel-compatible data.
-
Apache FOP — used in PDF creation and printing output.
The general system’s data flow is showcased on the diagram:
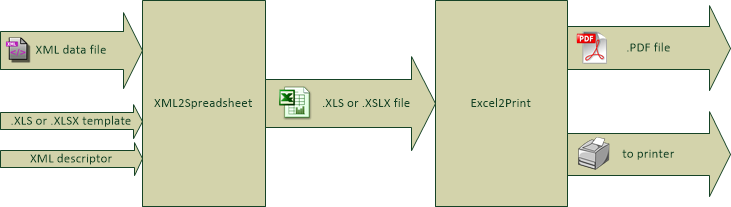
The system’s input accepts:
-
XML file with the source data.
-
.XLS or .XSLX template which defines the layout and format of the output document.
-
XML descriptor designating the input data traversal.
The output of the system is a file featuring the file extension and format corresponding to the input template (.XLS in case the template was .XLS or .XSLX otherwise). Further, the output XLS may be forwarded to the next stage and converted into a PDF file or sent directly for printing.
Installation
A Zip archive “xylophone…-bin.zip” with all the Java library dependencies can be downloaded at Maven Central
Phase One: Producing XLS and XLSX Files
System Usage
There are two ways to use the Xylophone:
-
usage as a command-line tool.
-
Usage as a Java library.
Usage As a Command-line Tool
To use as a command line tool, unzip the “xylophone-VERSION-bin.zip”. This archive contains folders named “lib” and “bin”. The “bin” folder contains shell scripts for launching in Windows and Linux environment.
Execute the following command:
xylophone -data datafile.xml -template template.xls[x] \
  -descr descriptor.xml -out result.xls [-sax] [-copytemplate]
where
-
datafile.xml — a file with the source XML data
-
template.xls[x] — a template with XLS or XLSX format
-
descriptor.xml — configuration file (previously mentioned as “descriptor”)
-
result.xls — output file name. Its file extension determines the output format, XLS or XLSX
-
sax — presence of this parameter defines if SAX parsing mode is to be used (more information below)
-
copytemplate — presence of this parameter defines if the template will be copied entirely to result with all of the contents present before the process.
Usage As a Library
To use Xylophone as the library you need to import
ru.curs.xylophone.XML2Spreadsheet class and call its static method
called process: XML2Spredsheet.process(…). There are several
overloaded versions of this method with the following parameters.
-
File/InputStream xmlData — source data.
-
File/InputStream xmlDescriptor — descriptor data, describing the order of data iteration.
-
File/InputStream template — the report template.
-
ru.curs.flute.xml2spreadsheet.OutputType outputType — report template type (OpenOffice, XLS, XLSX). This argument is omitted if the arguments xmlData, xmlDescriptor, template are of type File. In such case, the value of the argument is deduced by the template’s file extension.
-
boolean useSAX — parsing mode, DOM if false, SAX if true, the differences are listed below.
-
boolean copyTemplate — should the template be copied prior to data emission. Optional argument, false by default. The option is used if the existing contents of the templates need to be transferred to the output. For instance, existing diagrams, graphics, and other things.
-
OutputStream output — the output stream which the system’s output will be written into.
Additionally there is the XML2Spreadsheet.toPOIWorkbook(xmlData, xmlDescriptor, template, useSAX, copyTemplate) method, which returns an instance of org.apache.poi.ss.usermodel.Workbook, serving an object-based report representation. This method will be useful in cases where a report is to go through additional post-processing step prior to serialization.
Groovy example (try out this demo project):
@Grab('ru.curs:xylophone:6.1.9')
import ru.curs.xylophone.XML2Spreadsheet
baseDir = '.'
new File(baseDir, 'testdata.xml').withInputStream {
    input ->
        new File(baseDir, 'report.xlsx').withOutputStream {
            output ->
                XML2Spreadsheet.process(input,
                        new File(baseDir, 'descriptor.xml'),
                        new File(baseDir, 'template.xlsx'),
                        false, output)
        }
}
println 'Done.'
Controlled XML Traversal
Output to a spreadsheet document goes as follows:
-
the system traverses the elements (tags) in the XML data file in a specific way (the traverse algorithm is controlled by the XML configuration file or a descriptor file),
-
at the specified moments the template fragments are copied to the resulting document; the template data fields are filled with information in the context of the current element in the XML data file.
While traversing an XML data file the system can assume one of the three modes:
-
Element reading mode
-
Output mode
-
Iteration mode
The mode transition graph:
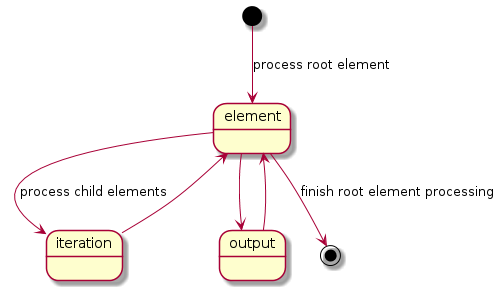
The description of the XML data file traversal via the description of three possible modes is below.
Element Reading Mode
When processing starts, the system sets the root element in the data
document as current context and switches to the element reading mode. At
the beginning of processing, the system expects the root element of the
configuration file to be a tag of the kind
<element name="root_element_name">, i.e. the value of the name
attribute of the root tag must match the name of the root element in the
data file. Otherwise, the system will not perform the output. That is,
if the data file has the following structure
<root>
    ...
</root>
then the configuration file must look like this:
<element name="root">
    ...
</element>
All the other <element> tags must also have the name attribute.
In element reading mode, the system reads the child tags of the
<element> tag from the descriptor file. They can belong to one of
the following types: <output> and <iteration> The system switches to
output mode or iteration mode respectively. There can be any number of
<output> and <iteration> child tags in the <element> tag, and
they can go in any order, since the system processes them in sequence,
one after another.
The name attribute supports the following values:
-
Direct specification of the tag name. In this case, the interpreter starts to process
<element>only if the tag name in the scanned data file matches the one specified in the attribute. -
* value (asterisk). In this case, any tag in the data file is suitable for processing.
-
A simple XQuery expression of type tagname[@attribute='value']. Processing occurs only when the tag name matches the tag name value, and the attribute value equals value. NOTE: we only support expressions of this type, with a single attribute and the "= " sign. The
<, >characters, and Boolean expressions with multiple conditions WILL NOT work. Only a tagName[@attribute='value'] expression will work (quotes can be single or double, depending on the circumstances, using " is also allowed). -
(before) and (after) values. They are used to output a "prologue" and "epilogue" of a sequence of elements.
Iteration Mode
In iteration mode the system works as follows:
-
The context value of the current data item is remembered in order to restore it after the iteration is completed.
-
Then, depending on the value of the index attribute:
-
If the
<iteration>tag does not have an index attribute, all subelements of the current element of data document are read, and each of them is set as the current one successively. -
If the
<iteration>tag has an index attribute, it is read, and set as the current specific subelement of the current element. The value of the index attribute can be an integer starting from zero.
-
-
After the next current element is read and set, the system sequentially reads all subelements of the
<iteration>tag, which can only be of the<element>type. -
If the
<element>tag with the name=”(before)" attribute is encountered, then the parent data element is processed first, making it possible to output the “header” of the elements sequence. -
If the value of the name attribute of the
<element>tag matches with the name of the current element (or the name attribute is set to '*'), the system switches to the element reading mode described above. -
If the
<element>tag with the name=”(after)" attribute is encountered, the parent data element is processed last, making it possible to output the “footer” of the elements sequence. -
<iteration>tag can have a mode attribute, setting the mode of template fragments composition in the output file. Possible values are:-
no value – the template fragments that are presented in output mode are arranged from top to bottom in the resulting document.
-
horizontal – template fragments are arranged from left to right in the resulting document.
-
-
The
<iteration>tag can have the regionName attribute. If this attribute is set, then the iteration-formed block at the end of the iteration will be converted to a named range with the specified name. -
After the iteration is completed, the system restores the context value of the current element for subelements that started the iteration.
Since there can be any number of <iteration> tags inside the
<element> tag and any number of <element> tags inside the
<iteration> tag, this allows you to flexibly organize complex
traversals of the data file. For example, if the data file has the
following structure:
<root>
    <a></a>
    <a></a>
    <b></b>
    <a></a>
    <b></b>
    <b></b>
    <a></a>
</root>
— i.e, inside the root element, the <a> and <b> tags go in random
order, then in order to process <a> and <b> tags in the same
sequence as they go in the data file, the configuration file should look
like:
<element name="root">
    <iteration>
        <element name="a">
        </element>
        <element name="b">
        </element>
    </iteration>
</element>
or
<element name="root">
    <iteration>
        <element name="*">
        </element>
    </iteration>
</element>
and in order to process all the <a> tags first, and then all the <b>
tags
<element name="root">
    <iteration>
        <element name="a">
        </element>
    </iteration>
    <iteration>
        <element name="b">
        </element>
    </iteration>
</element>
In order to process the zero and then the first tag, regardless of the names of these tags, the configuration file should look like this:
<element name="root">
    <iteration index="0">
        <element name="*">
        </element>
    </iteration>
    <iteration index="1">
        <element name="*">
        </element>
    </iteration>
</element>
Output Mode
When the system switches to output mode, it copies a template fragment
to a specific location in the resulting file, and fills that fragment
with data based on the current data file element. The <output> tags
can only be found inside the <element> tag, but there can be as many
of them as you want, and they can go in random order mixed with the
<iteration> tags. The attributes of the <output > tag are
-
sourcesheet — an optional attribute that points to the template workbook sheet from which the output range is taken. If not specified, the current (last used) sheet is used.
-
range – an optional attribute, template range, that is copied to the resulting document, for example “A1:M10”, or “5:6”, or “C:C”. Usage of ranges of rows like “5:6” in left-to-right output mode or of column ranges like “C:C” in top-to-bottom output mode will cause an error.
-
worksheet – an optional attribute. If it is defined, a new sheet is created in the output file, and the output position is moved to the A1 cell of that sheet. If you define a value for this attribute that is equal to a constant or XPath expression, the sheet name is substituted from that constant or the result of the expression.
-
repeatingcols, repeatingrows — optional attributes that go together with the worksheet attribute. They set the header/footer (repeated on each sheet) columns/rows for a new sheet. The values should be specified in the "1:2" format with numeration starting from ZERO (for example, to repeat the first line on each page, you must set repeatingrows=" 0: 0")
-
pagebreak — if this attribute is present as
pagebreak="true", the output of the next section of the report will start with a new page. In this case, if the current output mode is from top to bottom, then a horizontal page break is formed, and if it is from left to right, then a vertical page break is created. Sometimes “widow” and “orphan” lines in the report are unacceptable (this often relates to the footer elements with the results and signatures). If the Xylophone report is created for instant printing (without manual adjustment), the pagination should be performed correctly at once.
Example
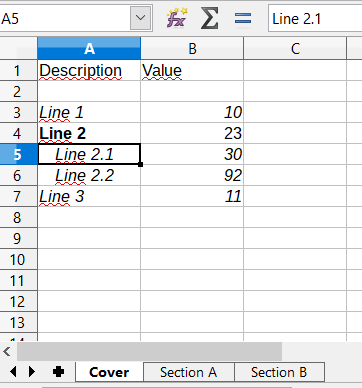
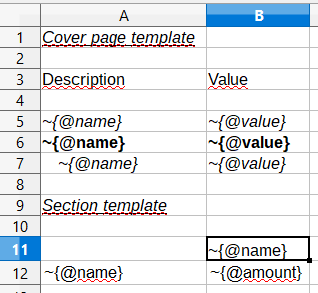
Let’s say we need a report consisting of a title sheet and several section sheets (names of those are defined by input data). Suppose the title sheet has a hierarchical list of elements that belong to different levels and require different render.
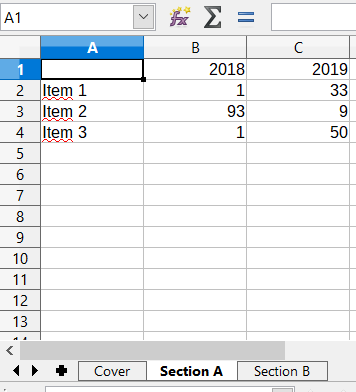
There may be any amount of sections, this is specified by the input data. Those sections contain tables with different numbers of lines and columns:
Data presented in the XML file has the following structure:
<?xml version="1.0" encoding="UTF-8"?>
<report>
    <titlepage>
        <line name="Line 1" value="10"/>
        <group name = "Line 2" value = "23">
            <line name = "Line 2.1" value="30"/>
            <line name = "Line 2.2" value="92"/>
        </group>
        <line name = "Line 3" value="11"/>
    </titlepage>
    <sheet name="Section A">
        <column name="2009"/>
        <column name="2010"/>
        <column name="2011"/>
        <row name="Item 1">
            <cell value = "1"/>
            <cell value = "33"/>
            <cell value = "34"/>
        </row>
        <row name="Item 2">
            <cell value = "93"/>
            <cell value = "9"/>
            <cell value = "1"/>
        </row>
        <row name="Item 3">
            <cell value = "1"/>
            <cell value = "50"/>
            <cell value = "2"/>
        </row>
    </sheet>
    <sheet name="Section B">

    </sheet>
</report>
In this case the template containing layout and substitutionfields for the title sheet and sections might look like this:
Substitution fields have the following format:
~{Xpath-expression}(tilde, opening curly brace, Xpath expression relative to the current XML context, closing brace)
| The key to creating reports via Xylophone successfully is writing correct Xpath expressions. Those expressions are extracting data from current XML file’s context; if you’re not familiar with Xpath you can learn more about it here [1]. |
Besides standard syntax you can also use some specific functions in XPath expression:
-
current() — will be replaced with a full XPath expression to the current node during extraction. It is a full analogue of the XSLT’s current() function, essential for complex XPath expressions. The presence of this function is justified for the same reasons as in XSLT’s current() (please refer to XSLT’s documentation on current() and its distinction from . (dot)).
-
position() — an iteration number. Will be replaced with the number of a current iteration during extraction. Helps with simple sequential numeration of steps in the report (you can use it instead of placing numeration to file’s tags).
Helpers
You may use helpers to further specify cell behaviour. Helpers should be separated with vertical bar from the cell contents.
For example Some text ~{foo}|mergeup:"ifequals"; will merge cell with the upper cell if its content is equal to that of the upper cell.
Currently supported helpers:
-
mergeup, mergeleft
-
ifequals
-
yes
-
no
-
-
backgroundcolor
-
color
-
fontfamily
-
fontsize
-
margin — specifies left margin of the cell. The simplest way to introduce hierarcy to the report column.
Illustrative information
Please note that the template may contain some illustrative information that won’t end up in the resulting document. It’s a good practice to provide some explaining information in your template, making further improvements easier.
The descriptor file managing the XML traverse might look like this:
<?xml version="1.0" encoding="UTF-8"?>
<element name="report">
    <!-- Output of the sole title sheet with hierarchy -->
    <iteration index="0">
        <element name="titlepage">
            <!-- Static name of sheet -->
            <output worksheet="Title" range="A3:B4"/>
            <iteration>
                <element name="line">
                    <output range="A5:B5"/>
                </element>
                <element name="group">
                    <output range="A6:B6"/>
                    <iteration>
                        <element name="line">
                            <output range="A7:B7"/>
                        </element>
                    </iteration>
                </element>
            </iteration>
        </element>
    </iteration>
    <!-- Output of all other sheets with summary tables -->
    <iteration>
        <element name="sheet">
            <!-- A dynamical name of sheet -->
            <output worksheet="~{@name}"/>
            <!-- Columns’ titles from left to right after that -->
            <iteration mode="horizontal">
                <element name="(before)">
                    <!-- Output of an empty cell to the top left corner of a summary table -->
                    <output sourcesheet="src" range="A11"/>
                </element>
                <element name="column">
                    <output sourcesheet="src" range="B11"/>
                </element>
            </iteration>
            <!-- Output of lines: iteration with default output mode (from top to bottom) -->
            <iteration>
                <element name="row">
                    <!-- Line output, left to right -->
                    <iteration mode="horizontal">
                        <!-- Line’s title -->
                        <element name="(before)">
                            <output range="A12"/>
                        </element>
                        <element name="cell">
                            <output range="B12"/>
                        </element>
                    </iteration>
                </element>
            </iteration>
        </element>
    </iteration>
</element>
The SAX Mode For Huge Reports
The SAX mode is suitable for the situations requiring to form reports from tremendous data input quickly. This mode suggests that data file never loads into memory fully, and the resulting file formation is managed by the SAX events with increased processing speed and saving memory, allowing the system to process huge amounts of data. You can choose the SAX mode in Xylophone’s launch parameters, as the DOM mode is set by default. The SAX mode implies those structure limitations:
-
Just one
<iteration>tag inside every<element>tag. -
XPath links can point only to the current element’s attributes; position() function is supported.
If you restructure your XML data file this way, you can have point 1 and 2 executed for a wide range of tasks — for example, you can easily restructure XML for the “representative example”.
Phase 2. Output to PDF files and printer
Using the Excel2Print module you can converse the resulting Excel report into a PDF file or send it for printing right away.
| Please note that you can process only XLS files this way, the system does not support XLSX-to-PDF processing yet. |
| The system is not capable of outputting to PDF/printer any picture, shapes and charts, and in the nearest time that won’t be an option. |
Excel2Print Module Usage
The recommended pattern is:
@Grab('ru.curs:xylophone:6.1.9')
import ru.curs.xylophone.XML2Spreadsheet
import ru.curs.xylophone.Excel2Print

baseDir = '.'
new File(baseDir, 'testdata.xml').withInputStream {
    input ->
        //get the workbook using the toPOIWorkbook method
        workbook = XML2Spreadsheet.toPOIWorkbook(input,
                new File(baseDir, 'descriptor.xml'),
                new File(baseDir, 'template.xls'),
                false, false)
        //initialize Excel2Print converter with created workbook
        e2p = new Excel2Print(workbook)
        //set a file path for the Apache FOP configuration file
        //don't forget to change this file to set the right path to Fonts folder
        e2p.setFopConfig(new File(baseDir, "fop.xconf"))
        //Convert to PDF
        new File(baseDir, 'pdfresult.pdf').withOutputStream {
            pdfresult ->
                e2p.toPDF(pdfresult)
        }

        //If you skip this, the default printer will be used
        e2p.setPrinterName("My LaserJet Printer")
        e2p.toPrinter()
}

println 'Done.'
Known issues and an alternative way for printout
During the first launch the system caches fonts’ metrics, so it could take a while.
You can also send PDF file for printing quickly without using Acrobat Reader, with an open source GhostScript + GhostView system (www.ghostscript.com). The
gsprint myfile.pdfcommand sends PDF file to a printer and also has several additional parameters.